
25. 04. 2018
You can find a lot of tutorials on the Internet of shared code between platforms through Dynamic Frameworks, but some tutorials do not work anymore or they are unnecessarily complicated. So I decided to do tutorial with video.
As I’ve said, when we share code between iOS, tvOS, watchOS or macOS, so the simplest way is use Dynamic Framework, which is available on iOS from iOS 8.
We can divide tutorial to three parts:
- Creating framework, which contains our shared code
- Framework configuration for devices and simulators
- Using framework in iOS and macOS applications
If you are lazy to read, so here is the full video tutorial:
Creating a Dynamic Framework
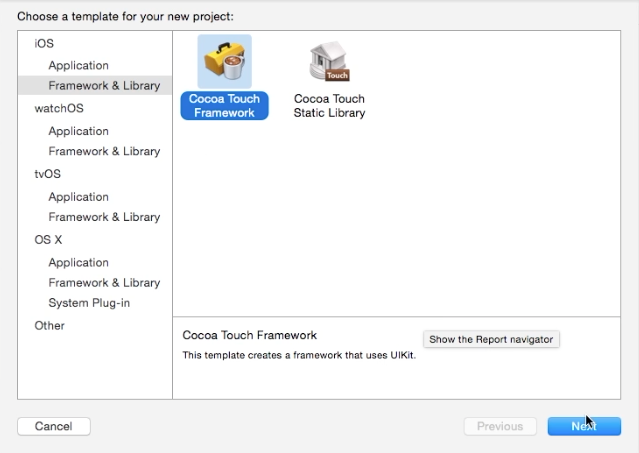
Open Xcode and create new project. File -> New -> Project. Choose iOS -> Framework & Library -> Cocoa Touch Framework and name it MyKit
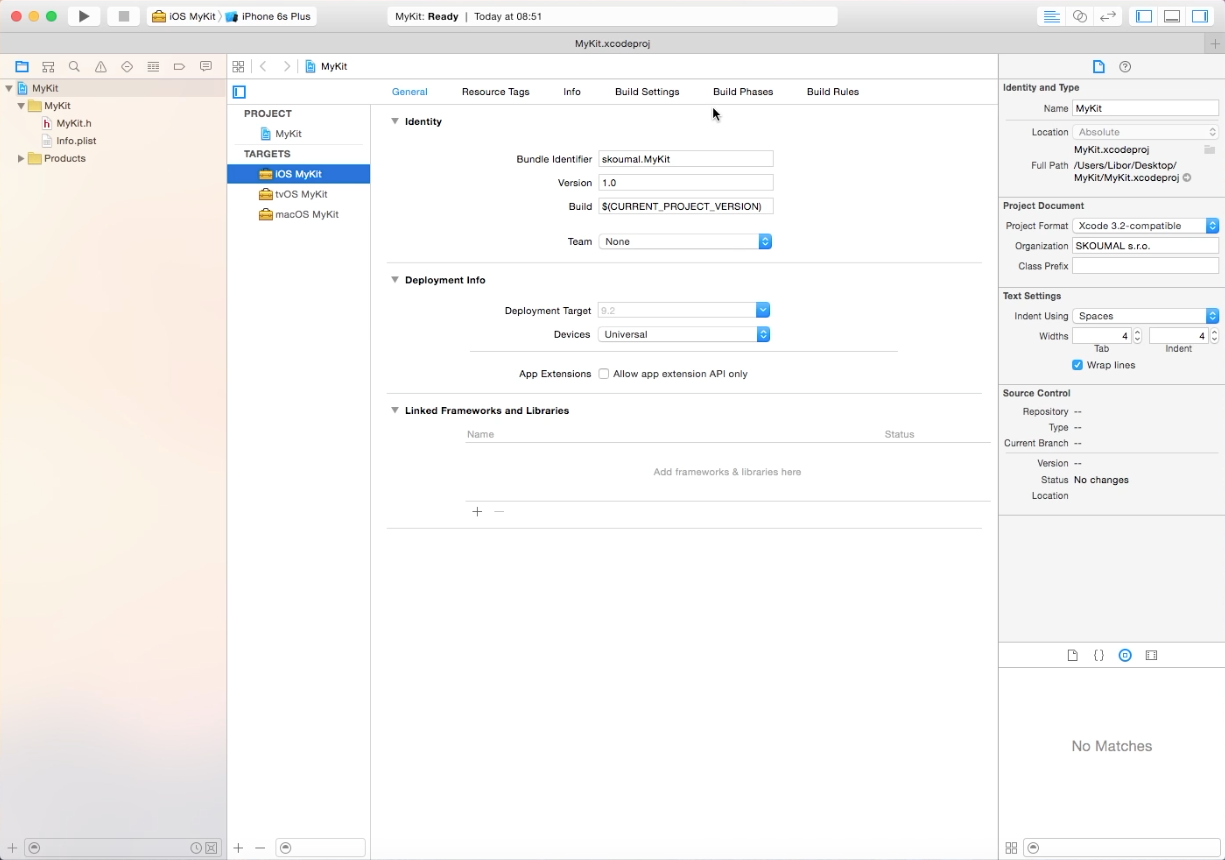
When you are done with project let’s go rename target inside project from MyKit to iOS MyKit and also rename automatically created scheme for this target. Schemes -> Manage Schemes
We add new target for macOS platform a name it macOS MyKit
We delete folder called macOS MyKit which was automatically created with new target for macOS
After all steps the project will be look something like this:
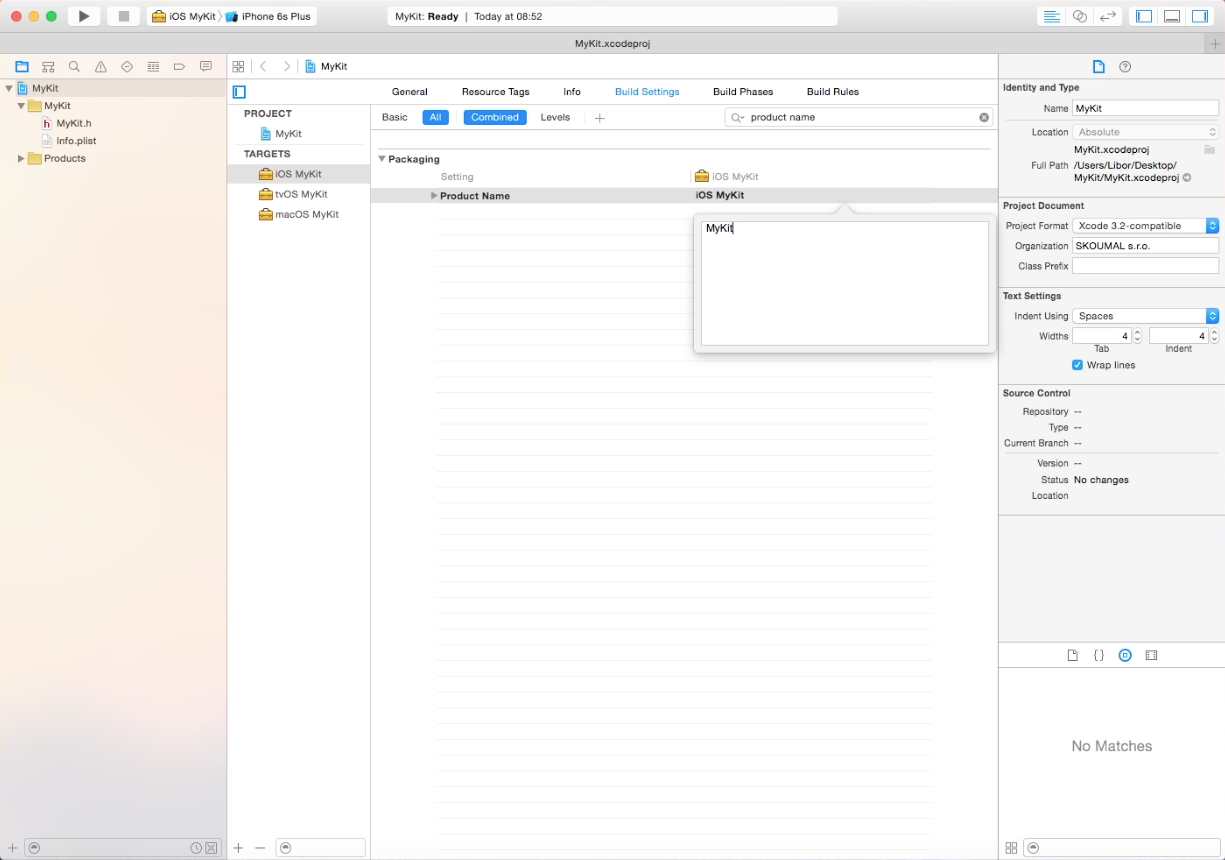
For each target we open Build Settings and search for Product Name and then we change value to MyKit. This step is important for keeping the same name of framework for each platform.
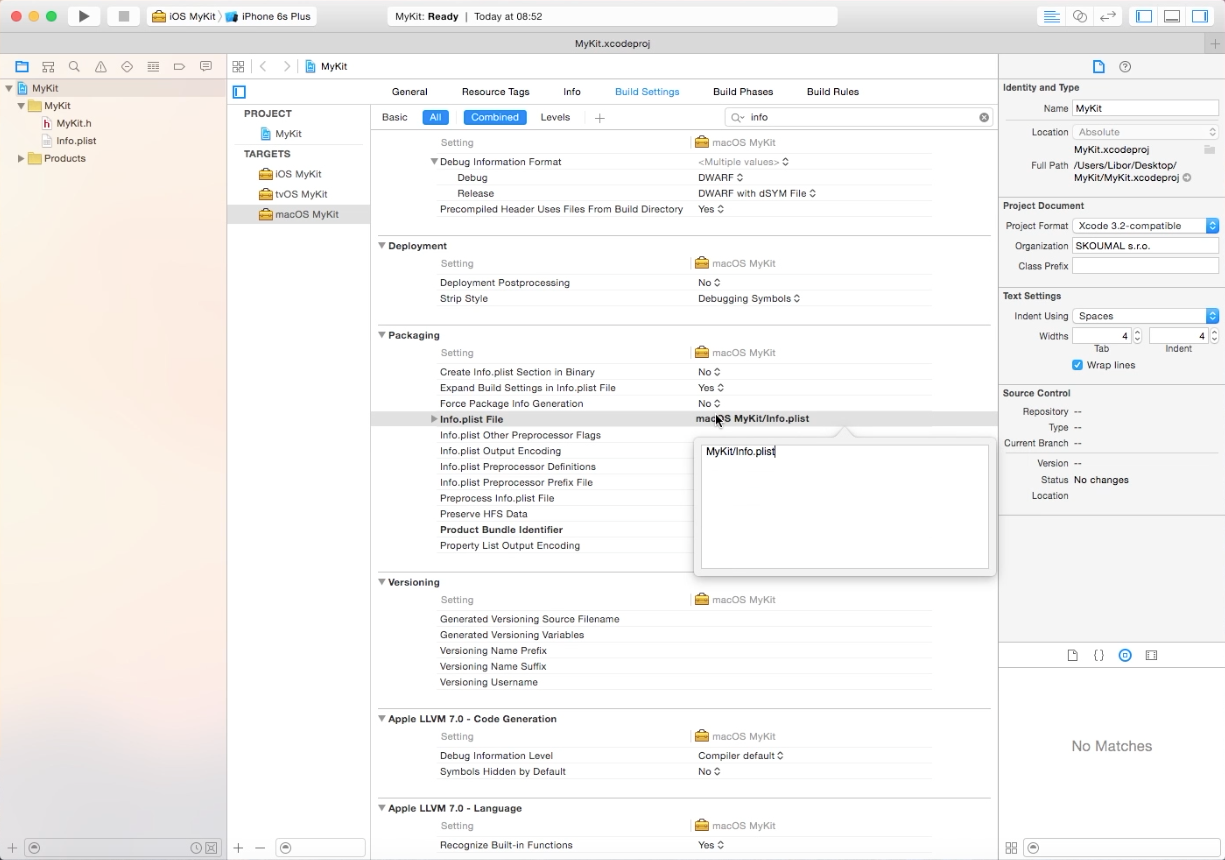
Again for each target in Build Settings search for Info.plist File and copy value from iOS MyKit target and then paste it to others targets. This step is important for keeping the only one Info.plist file of framework for each platform.
We create our first source file. File -> New -> File and choose iOS -> Source -> Swift File and name it Model. Do not forget to check all targets!
Content of Model.swift:
import Foundation

public class Model {

    public let devices: [String]

    public init() {
        self.devices = ["iPhone", "iPad", "iPod"]
    }

}
We create another file and this time it will be shell script. File -> New -> File and choose iOS -> Other -> Shell Script. Name it UniversalFramework and check only OS MyKit target.
Content of UniversalFramework.sh:
if [ "true" == ${ALREADYINVOKED:-false} ]
then
echo "RECURSION: Detected, stopping"
else
export ALREADYINVOKED="true"

UNIVERSAL_OUTPUTFOLDER=${BUILD_DIR}/${CONFIGURATION}-iosuniversal

# make sure the output directory exists
mkdir -p "${UNIVERSAL_OUTPUTFOLDER}"

# Step 1. Build Device and Simulator versions
xcodebuild -target "${TARGET_NAME}" ONLY_ACTIVE_ARCH=NO -configuration ${CONFIGURATION} -sdk iphoneos  BUILD_DIR="${BUILD_DIR}" BUILD_ROOT="${BUILD_ROOT}" clean build
xcodebuild -target "${TARGET_NAME}" -configuration ${CONFIGURATION} -sdk iphonesimulator ONLY_ACTIVE_ARCH=NO BUILD_DIR="${BUILD_DIR}" BUILD_ROOT="${BUILD_ROOT}" clean build

# Step 2. Copy the framework structure (from iphoneos build) to the universal folder
cp -R "${BUILD_DIR}/${CONFIGURATION}-iphoneos/${PROJECT_NAME}.framework" "${UNIVERSAL_OUTPUTFOLDER}/"

# Step 3. Copy Swift modules from iphonesimulator build (if it exists) to the copied framework directory
SIMULATOR_SWIFT_MODULES_DIR="${BUILD_DIR}/${CONFIGURATION}-iphonesimulator/${PROJECT_NAME}.framework/Modules/${PROJECT_NAME}.swiftmodule/."
if [ -d "${SIMULATOR_SWIFT_MODULES_DIR}" ]; then
cp -R "${SIMULATOR_SWIFT_MODULES_DIR}" "${UNIVERSAL_OUTPUTFOLDER}/${PROJECT_NAME}.framework/Modules/${PROJECT_NAME}.swiftmodule"
fi

# Step 4. Create universal binary file using lipo and place the combined executable in the copied framework directory
lipo -create -output "${UNIVERSAL_OUTPUTFOLDER}/${PROJECT_NAME}.framework/${PROJECT_NAME}" "${BUILD_DIR}/${CONFIGURATION}-iphonesimulator/${PROJECT_NAME}.framework/${PROJECT_NAME}" "${BUILD_DIR}/${CONFIGURATION}-iphoneos/${PROJECT_NAME}.framework/${PROJECT_NAME}"

fi
I modified the original script. Source HERE.
The new shell file is need to set as executable. Open terminal Aplications -> Utitlities -> Terminal. Then open UniversalFramework.sh file in finder. Write this command to terminal:
$ chmod u+x "path_to_file"

Switch back to the Xcode and select Project MyKit and target iOS MyKit then go to Build Phases.
Click on + button and choose New Run Script Phase and name it Universal Framework.
Insert this shell command:
${SRCROOT}/UniversalFramework.sh

Select iOS MyKit scheme and any simulator device.
Then we can build selected scheme. Product -> Build.
Change the scheme to macOS MyKit and run build again.
Inside left column select Products folder and right click on any MyKit.framework and choose Show in Finder.
We can see Debug-XYZ folders. Important folder for us is called Debug, which contains MyKit framework for macOS and folder Debug-iosuniversal, which contains MyKit framework for iOS and Simulator.
We are done with framework and it is ready for use 🙂
Let’s look at how to use our framework in iOS and macOS applications. In iOS application we have to remove x86/64 architecture from framework when we build application for iTunes (App Store).
How to use framework
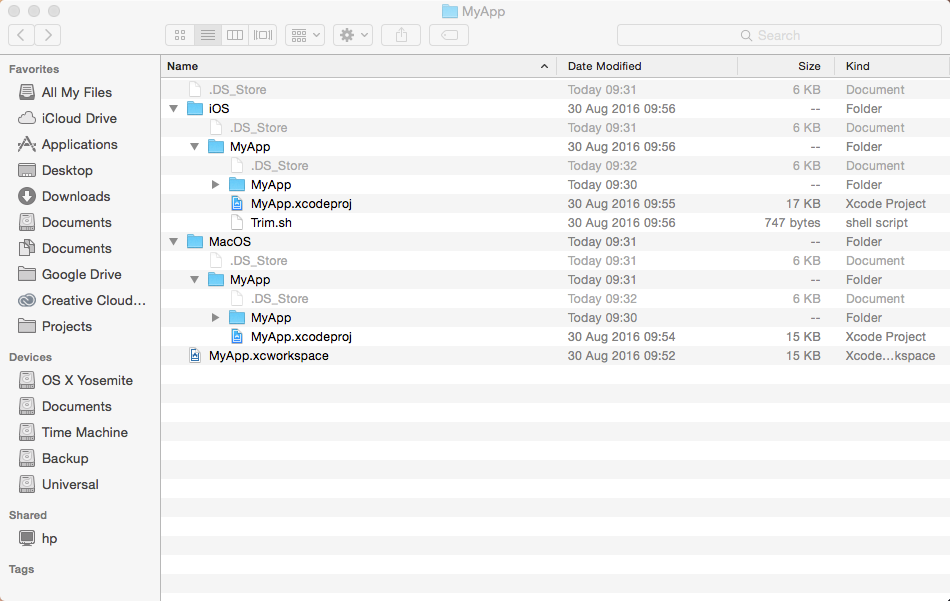
Create new Workspace. File -> New -> Workspace and name it MyApp. I recommended create folder with same name and save workspace file into it.
In the left corner click on the + button and choose New Project.
We select iOS -> Application -> Single View Application and name it MyApp. I recommended create folder with iOS name and save new project into it.
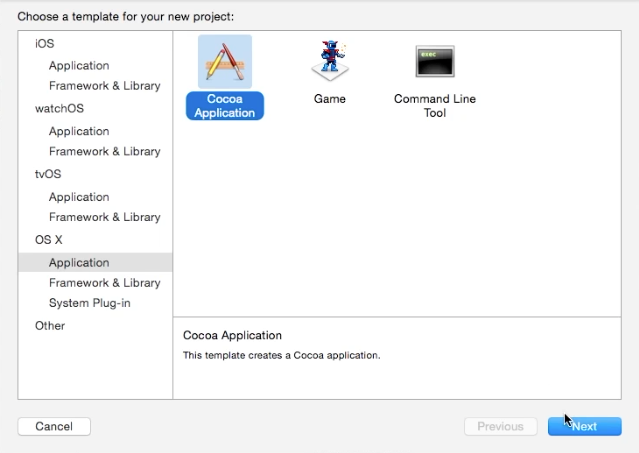

We create new project, but this time macOS application. OS X -> Application -> Cocoa Application and name it MyApp. Again, I recommended create folder with macOS name and save the project into it.
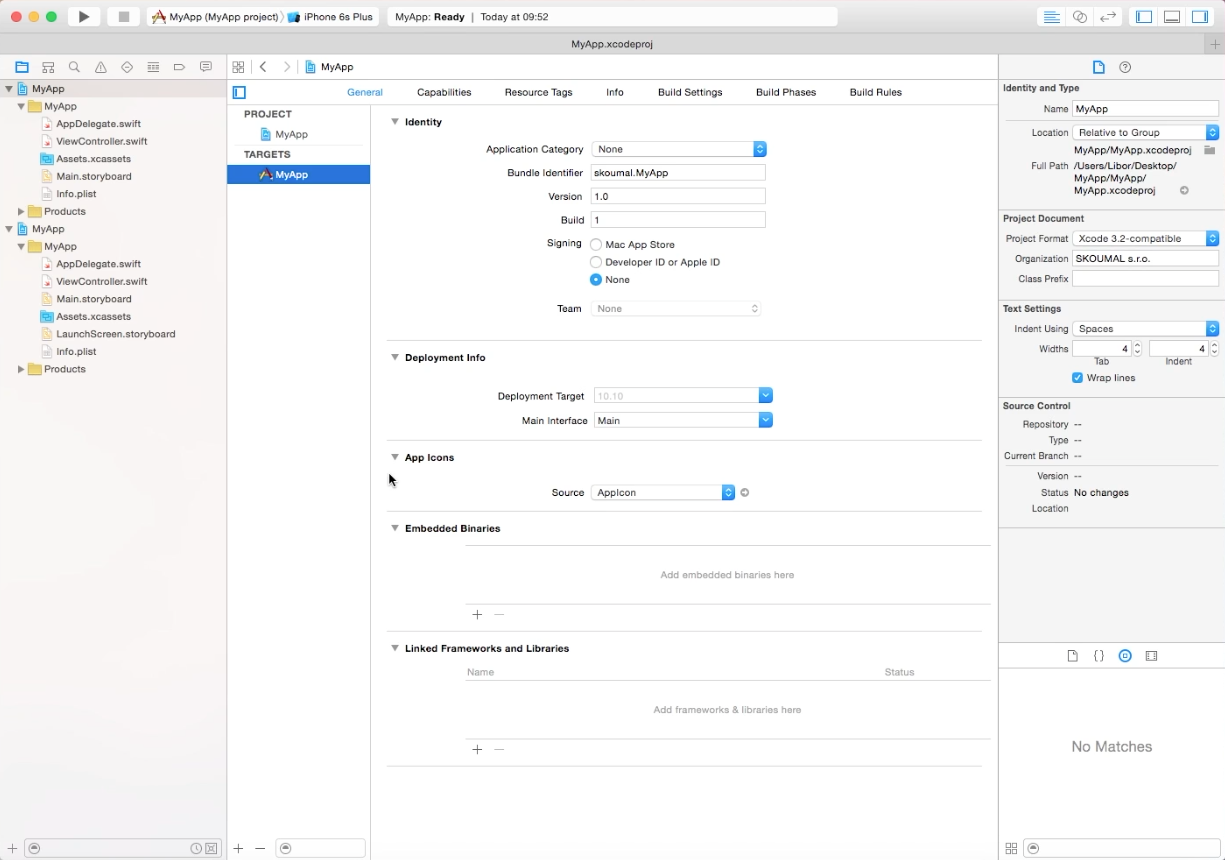
Inside workspace we select iOS application and click on General tab. From Debug-iosuniversal folder, which we opened at the end of first section, we move MyKit.framework to Embedded Binaries. Be sure, that check box Copy Items If needed is unchecked.
The same action we do it for macOS application, but this time we move MyKit.framework from Debug folder.
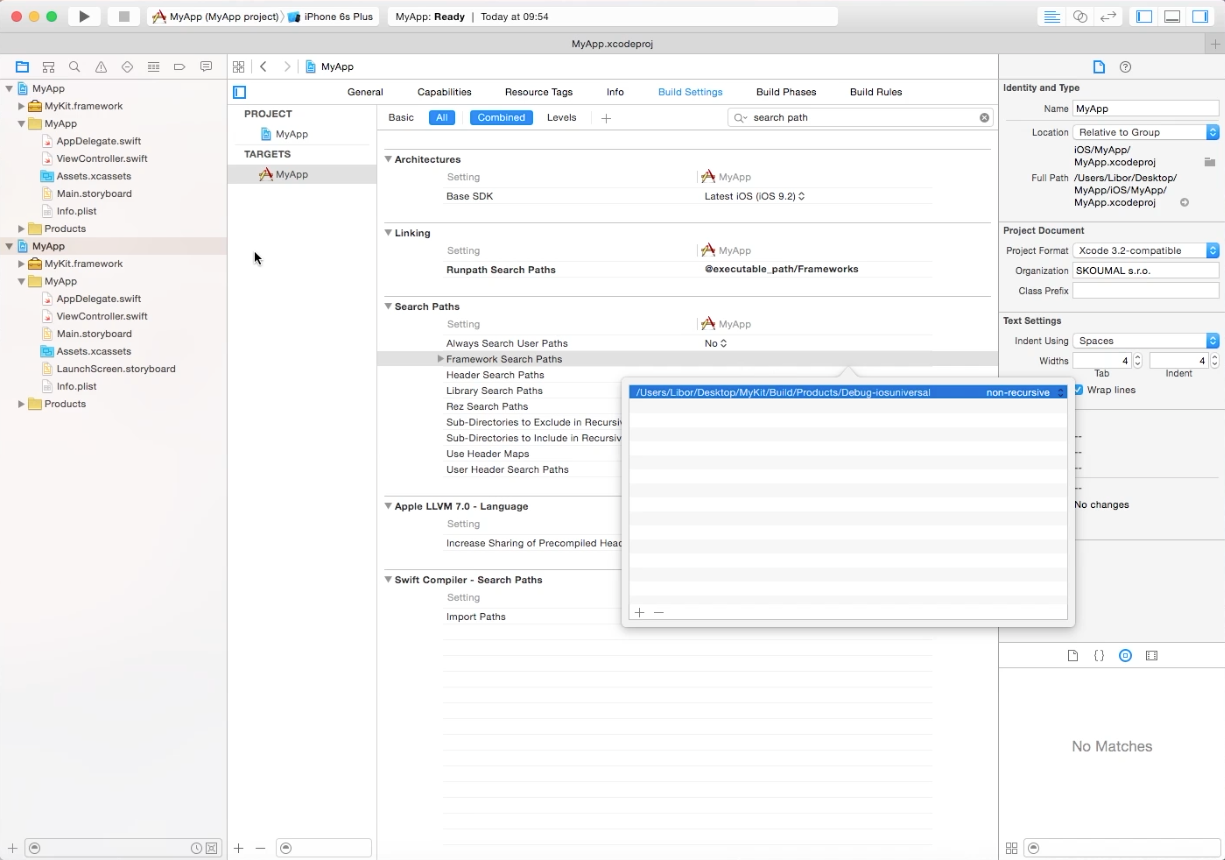
For iOS and also for macOS application we selecct Build Settings tab and search for Framework Search Paths then we add path to framework. For iOS it will be path to Debug-iosuniversal and for macOS Debug folder.
Now it is time for using our framework inside applications. Select ViewController.swift file in iOS application and replace content with this code:
import UIKit
import MyKit

class ViewController: UIViewController {

    override func viewDidLoad() {
        super.viewDidLoad()

        let model = Model()
        print(model.devices)

        // Do any additional setup after loading the view, typically from a nib.
    }

    override func didReceiveMemoryWarning() {
        super.didReceiveMemoryWarning()
        // Dispose of any resources that can be recreated.
    }

}
Same action we do it for macOS application. So select ViewController.swift file in macOS application and replace content with this code:
import Cocoa
import MyKit


class ViewController: NSViewController {

    override func viewDidLoad() {
        super.viewDidLoad()

        let model = Model()
        print(model.devices)

        // Do any additional setup after loading the view.
    }

    override var representedObject: AnyObject? {
        didSet {
        // Update the view, if already loaded.
        }
    }

}
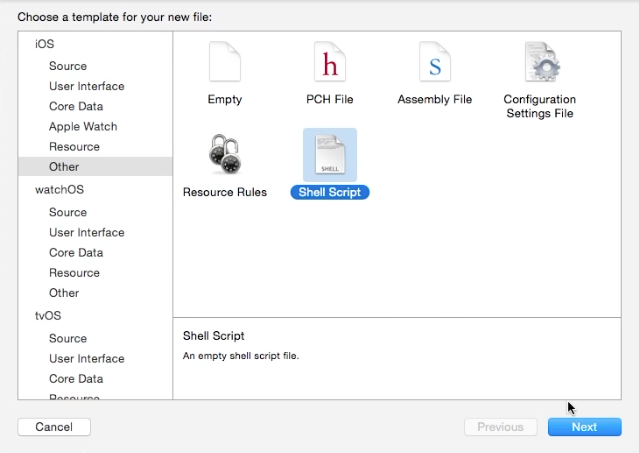
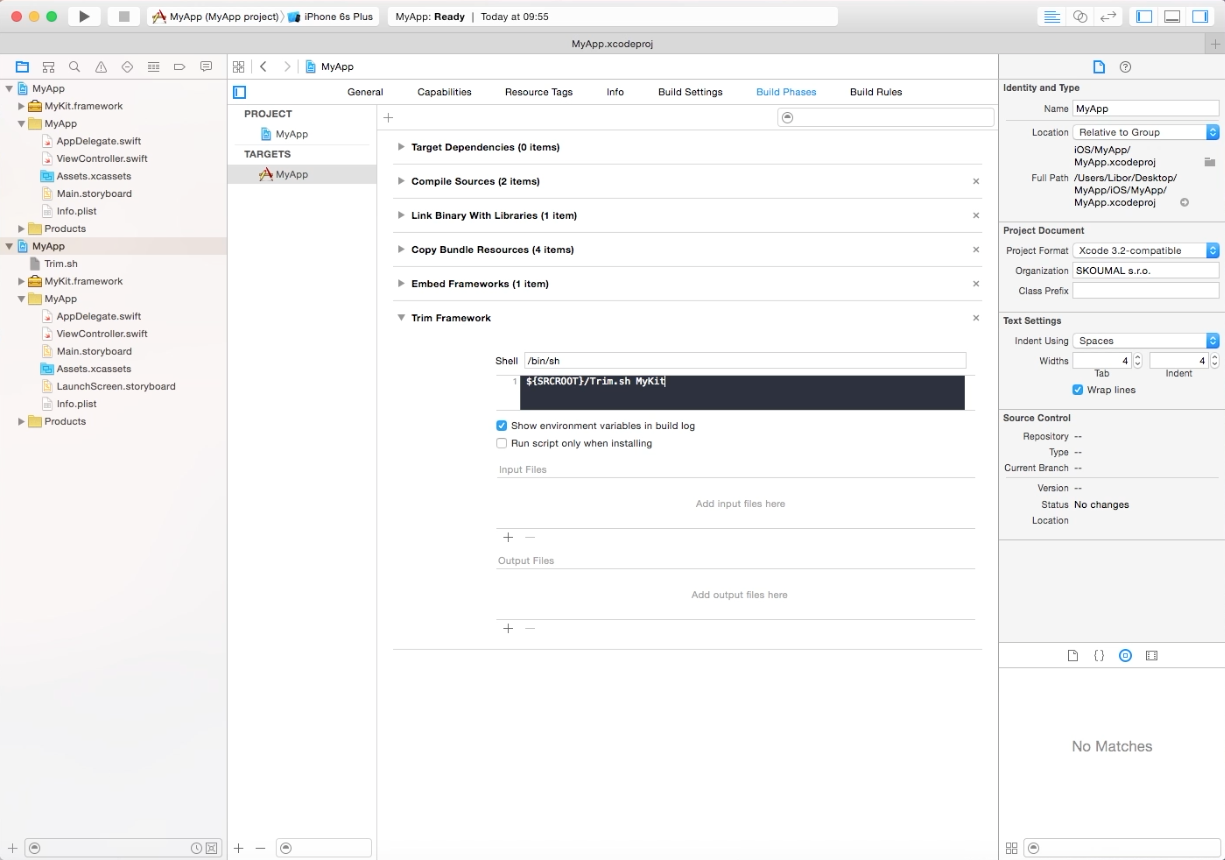
Inside iOS application we create new shell script. File -> New -> File then OS -> Other -> Shell Script and name it Trim.sh
Content of Trim.sh:
FRAMEWORK=$1
echo "Trimming $FRAMEWORK..."

FRAMEWORK_EXECUTABLE_PATH="${BUILT_PRODUCTS_DIR}/${FRAMEWORKS_FOLDER_PATH}/$FRAMEWORK.framework/$FRAMEWORK"

EXTRACTED_ARCHS=()

for ARCH in $ARCHS
do
echo "Extracting $ARCH..."
lipo -extract "$ARCH" "$FRAMEWORK_EXECUTABLE_PATH" -o "$FRAMEWORK_EXECUTABLE_PATH-$ARCH"
EXTRACTED_ARCHS+=("$FRAMEWORK_EXECUTABLE_PATH-$ARCH")
done

echo "Merging binaries..."
lipo -o "$FRAMEWORK_EXECUTABLE_PATH-merged" -create "${EXTRACTED_ARCHS[@]}"
rm "${EXTRACTED_ARCHS[@]}"

rm "$FRAMEWORK_EXECUTABLE_PATH"
mv "$FRAMEWORK_EXECUTABLE_PATH-merged" "$FRAMEWORK_EXECUTABLE_PATH"

echo "Done."
Source HERE.
Again, in Terminal we set file as executable.
$ chmod u+x "path_to_file"
Select Build Phases tab and click on + button and choose New Run Script Phase and name it Trim Framework.
Insert this shell command:
${SRCROOT}/Trim.sh MyKit
We select scheme for iOS application and build it. Product -> Build.
We repeat previous step for macOS application.
And we are finally done!